Introduction
Apache Spark is a popular and powerful open source distributed data processing engine. One of the key strength of Spark is its distributed nature, allowing parallelization of data processing, which can take advantage of horizontally scalable compute infrastructure, like a Kubernetes cluster.
Google’s Spark Operator is commonly used in most tutorials available online, as an example of running Spark on Kubernetes. But doing it without the operator helped me understand batter the how it all actually works. This approach also provides greater flexibility and control over the deployment process, making it suitable for custom setups and specific use cases, such as the one I had to work with.
Another element of Spark on Kubernetes that lacks example and tutorials online is Dynamic Resource Allocation. Here I will attempt to provide some example and guidance on this.
So I will be integrating the following components to crate a Spark application environment:
- Minio: An on-premises object storage solution compatible with the S3 protocol, used for storing Spark event logs and other data.
- Spark History Server: A tool for monitoring and analyzing completed Spark jobs, with logs stored in Minio.
- Dynamic Resource Allocation: A feature that optimizes resource usage by scaling Spark executors based on workload demands.
By the end of this article, you will have a comprehensive understanding of how to set up and run Spark on Kubernetes, build custom container images, configure Kubernetes resources, and test dynamic resource allocation. All the code and configurations used in this post are available in the GitHub repository.
Perquisites
The obvious perquisite here is to have a Kubernetes cluster to do the deployment on, with some storage and networking solutions. Here I will be using a 2 node K3s cluster with Longhorn for storage and metalLB for networking adn access to to workload. The setup and usage of this setup is presupposed, but I might do another post on this in the future. I am also using Kustomize to decare my k8s resources for deployment.
The second perquisite is to have Podman/Docker to build the container images we will be using, and a registry to push the images to. I am hosting Gitea on my K3s cluster, which acts as my container registry where Kube pulls the images form.
Finally, and optionally you can use the Minio client to interact with the Minio instance we are going to deploy, to create buckets, and upload and download files. Or you could also use the UI.
This post assumes resonate knowledge and familiarity with Kubernetes and Spark. For a more beginner friendly guide, checkout this article
Container Images
Although Spark provide official images, they don’t come with some additional dependencies that we would require. Also, in some cases there is a requirement to use only approved base images and dependencies. Hence creating our own images can be beneficial.
Here I have created 2 images. The first is used for the Spark driver, executor and history, basally being the based Spark Image. The second, which uses the first as the base image, will have additional Jupyter lab to act as our workspace and client to run our spark applications from.
Base spark image
I used the Red Hat UBI image as the base, and users a 2 stage build. The first stage is to download and untar the Spark bundler, AWS SDK Jar bundles (to connect to Minio using the S3 protocol) and bouncy castle dependencies (needed to connect the K8s API). The second stage, which is also the final image, is to copy needed stuff from the first stage. Java 21 and Python 3,12 are also installed.
# staging to download and collect all the required dependencies
FROM registry.access.redhat.com/ubi9/ubi as stage

# Versions
ARG SPARK_VERSION=3.5.4
ARG SPARK_MAJOR_VERSION=3.5
ARG HADOOP_VERSION=3.3.4
ARG AWS_SDK_VERSION=1.12.780
ARG BOUNCY_CASTLE_VERSION=1.80

WORKDIR /opt

# Download and untar spark
RUN mkdir -p /opt/spark/ \
&& curl -fsSL https://dlcdn.apache.org/spark/spark-${SPARK_VERSION}/spark-${SPARK_VERSION}-bin-hadoop3.tgz -o spark-${SPARK_VERSION}-bin-hadoop3.tgz \
&& tar xvzf spark-${SPARK_VERSION}-bin-hadoop3.tgz --directory /opt/spark/ --strip-components 1 \
&& rm -rf spark-${SPARK_VERSION}-bin-hadoop3.tgz

# Download AWS bundles to connect with S3
RUN curl -fsSL https://repo1.maven.org/maven2/org/apache/hadoop/hadoop-aws/${HADOOP_VERSION}/hadoop-aws-${HADOOP_VERSION}.jar \
 -o /opt/spark/jars/hadoop-aws.jar \
 && curl -fsSL https://repo1.maven.org/maven2/com/amazonaws/aws-java-sdk-bundle/${AWS_SDK_VERSION}/aws-java-sdk-bundle-${AWS_SDK_VERSION}.jar \
 -o /opt/spark/jars/aws-sdk-bundle.jar

# Download bouncy castle dependencies for authentication with k8s API
RUN curl -fsSL https://repo1.maven.org/maven2/org/bouncycastle/bcprov-jdk18on/${BOUNCY_CASTLE_VERSION}/bcprov-jdk18on-${BOUNCY_CASTLE_VERSION}.jar \
 -o /opt/spark/jars/bcprov-jdk18on.jar \
 && curl -fsSL https://repo1.maven.org/maven2/org/bouncycastle/bcpkix-jdk18on/${BOUNCY_CASTLE_VERSION}/bcpkix-jdk18on-${BOUNCY_CASTLE_VERSION}.jar \
 -o /opt/spark/jars/bcpkix-jdk18on.jar


# Main image
FROM registry.access.redhat.com/ubi9/ubi-minimal:latest

# user IDs to run image as
ARG RUN_AS_USER=1000

# update and install java and python dependencies
RUN microdnf update -y \
 && microdnf --nodocs install shadow-utils java-21-openjdk-headless python3.12 python3.12-setuptools python3.12-pip tar gzip procps -y \
 && microdnf clean all -y \
 && rm -f /usr/bin/python \
 && rm -f /usr/bin/python3 \
 && ln -s /usr/bin/python3.12 /usr/bin/python \
 && ln -s /usr/bin/python3.12 /usr/bin/python3 \
 && ln -s /usr/bin/pip3.12 /usr/bin/pip \
 && ln -s /usr/bin/pip3.12 /usr/bin/pip3

# Install tini
ARG TINI_VERSION=v0.19.0
ARG TINI_ARCH=amd64
RUN curl -fsSL "https://github.com/krallin/tini/releases/download/${TINI_VERSION}/tini-static-${TINI_ARCH}" -o /usr/bin/tini \
 && chmod +x /usr/bin/tini

# set up non root user
RUN useradd -u ${RUN_AS_USER} -g root spark

# setup opt dir for spark user
RUN mkdir -p /opt/spark/ && chown -R spark:root /opt

# Copy all the spark files
COPY --from=stage --chown=spark:root /opt/spark/jars /opt/spark/jars
COPY --from=stage --chown=spark:root /opt/spark/bin /opt/spark/bin
COPY --from=stage --chown=spark:root /opt/spark/sbin /opt/spark/sbin
COPY --from=stage --chown=spark:root /opt/spark/kubernetes/dockerfiles/spark/entrypoint.sh /opt/
COPY --from=stage --chown=spark:root /opt/spark/kubernetes/dockerfiles/spark/decom.sh /opt/
COPY --from=stage --chown=spark:root /opt/spark/examples /opt/spark/examples

# Pyspark files
COPY --from=stage --chown=spark:root /opt/spark/python/pyspark /opt/spark/python/pyspark
COPY --from=stage --chown=spark:root /opt/spark/python/lib /opt/spark/python/lib

# Setup env variables
ENV JAVA_HOME=/usr/lib/jvm/jre-21
ENV SPARK_HOME=/opt/spark
ENV PYTHONPATH=$SPARK_HOME/python:$SPARK_HOME/python/lib/py4j-0.10.9.7-src.zip:$PYTHONPATH

# setting up work dir and permissions
WORKDIR /opt/spark/work-dir
RUN chmod g+w /opt/spark/work-dir
RUN chmod a+x /opt/decom.sh

ENTRYPOINT [ "/opt/entrypoint.sh" ]

# switch to spark user
USER spark
Spark Jupyter image
As mentioned, this image uses te Spark Base image created above and install Jupyter lab.
ARG SPARK_BASE
FROM ${SPARK_BASE}

USER root

RUN pip install jupyter

WORKDIR /home/spark

COPY --chown=spark:root --chmod=777 entrypoint.sh /home/spark/entrypoint.sh

USER spark

ENTRYPOINT ["bash", "-c", "./entrypoint.sh"]
The Jupyter lab is started in the entrypoint.sh:
#/bin/bash

echo "changing dir"
cd workspace

echo "starting jupyter lab"
jupyter-lab \
  --ip='0.0.0.0' \
  --NotebookApp.token="${TOKEN}" \
  --NotebookApp.password="${PASSWORD}" \
  --port=8888 \
  --no-browser
We will see later how this works, when deployed into the cluster.
Kubernetes Resources
All the kubernetes resources are templated and deployed using Kustomize, which defines all the resources to be deployed. The first thing to be defined here is the namespace resource. The rest of the resources are listed below.
Minio Object Storage
I will be using a single node deployment of Minio on my kube cluster. Of course this is not recommended for production, but sufficient for this example. Longhorn will be providing the storage backend:
apiVersion: v1
kind: PersistentVolumeClaim
metadata:
  name: minio-pvc
  namespace: spark
spec:
  accessModes:
    - ReadWriteOnce
  storageClassName: longhorn
  resources:
    requests:
      storage: 50Gi
Then a simple single replica deployment is setup:
apiVersion: apps/v1
kind: Deployment
metadata:
  name: minio
  namespace: spark
  labels:
    app: minio
spec:
  selector:
    matchLabels:
      app: minio
  template:
    metadata:
      labels:
        app: minio
    spec:
      containers:
      - name: minio
        image: quay.io/minio/minio:latest
        env:
          - name: "MINIO_ROOT_USER"
            value: "sparkminio"
          - name: "MINIO_ROOT_PASSWORD"
            value: "sparkminio"
        command:
          - /bin/bash
          - -c
        args:
          - minio server /data --console-address :9090
        resources: {}
        volumeMounts:
          - mountPath: /data
            name: data
      volumes:
        - name: data
          persistentVolumeClaim:
            claimName: minio-pvc
Finally using a loadbalancer service is used access it:
apiVersion: v1
kind: Service
metadata:
  name: minio
  annotations:
    metallb.universe.tf/loadBalancerIPs: 192.168.1.5
  labels:
    app: minio
spec:
  selector:
    app: minio
  ports:
    - name: api
      port: 9000
      targetPort: 9000
      protocol: TCP
    - name: webui
      port: 9090
      targetPort: 9090
      protocol: TCP
  type: LoadBalancer
Spark History Server
The Spark History Server is a service that allows us to analyze spark logs after the Spark jobs have completed. We will be using the based Spark image created, with some extra configurations. These configurations are setup using a ConfigMap resources:
apiVersion: v1
kind: ConfigMap
metadata:
  name: spark-conf
  namespace: spark
data:
  spark-defaults.conf: |
    # minio connection config
    spark.hadoop.fs.s3a.access.key=sparkminio
    spark.hadoop.fs.s3a.secret.key=sparkminio
    spark.hadoop.fs.s3a.endpoint=http://192.168.1.5:9000
    spark.hadoop.fs.s3a.path.style.access=true
    spark.hadoop.fs.s3a.connection.ssl.enabled=false

    # spark history server configs
    spark.history.fs.logDirectory=s3a://spark-on-kube/event-logs/
This ConfigMap, has the configuration needed for the server to connect to our Minio object store, and the specific bucket and path to look for spark logs in, which will also be used later.
With that setup, we can create out Deployment resource, that uses these configs, and starts the Spark History server:
apiVersion: apps/v1
kind: Deployment
metadata:
  name: spark-history-server
  namespace: spark
spec:
  selector:
    matchLabels:
      app: spark-history-server
  template:
    metadata:
      labels:
        app: spark-history-server
    spec:
      containers:
      - name: spark-history-server
        image: spark-aws:v1
        imagePullPolicy: Always
        command: ["/bin/bash", "-c", "/opt/spark/sbin/start-history-server.sh"]
        env:
          - name: SPARK_NO_DAEMONIZE
            value: "true"
        volumeMounts:
          - name: spark-conf
            mountPath: /opt/spark/conf/spark-defaults.conf
            subPath: spark-defaults.conf
      volumes:
        - name: spark-conf
          configMap:
            name: spark-conf
            items:
            - key: spark-defaults.conf
              path: spark-defaults.conf
And finally we expose it using a LoadBalancer service:
apiVersion: v1
kind: Service
metadata:
  name: spark-history-server
  annotations:
    metallb.universe.tf/loadBalancerIPs: 192.168.1.6
  labels:
    app: spark-history-server
spec:
  selector:
    app: spark-history-server
  ports:
    - name: http
      port: 18080
      targetPort: 18080
      protocol: TCP
  type: LoadBalancer
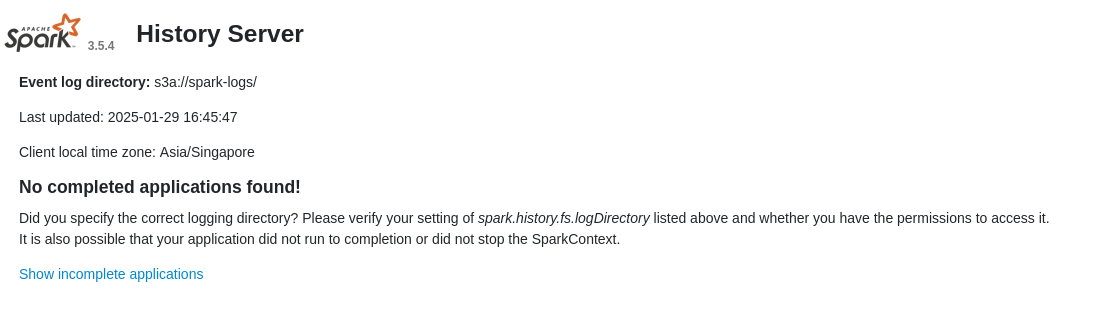
Deploying these resources, and accessing the loadbalancer service, you should see the home page:
RBAC
To allow the Spark Submit process to be able to spin up the drive and executor pods, and to be able to access the configmaps, and persistent volumes, we have to ensure that the correct permissions and access is provided. For this, we create several role based access control (RBAC) resources. The first is a Kubernetes service account:
apiVersion: v1
kind: ServiceAccount
metadata:
  name: spark
  namespace: spark
Then we create a Role with all permissions to the pods, services, configmaps and persistentvolumeclaims resource. This should be the bare minimum permissions required.
Finally, we create a RoleBinding, to attach the Role to the ServiceAccount:
apiVersion: rbac.authorization.k8s.io/v1
kind: RoleBinding
metadata:
  name: spark-role
subjects:
  - kind: ServiceAccount
    name: spark
    namespace: spark
roleRef:
  kind: Role
  name: spark-role
  apiGroup: rbac.authorization.k8s.io
Spark Jupyter Lab
This is the deployment that will be our development environment, from where we will actually start the spark sessions and do the testing.
So first we setup a persistent volume for the Jupyter lab workspace. In my case I did it by using a Longhorn based PersistentVolumeClaim:
apiVersion: v1
kind: PersistentVolumeClaim
metadata:
  name: jupyter-pvc
  namespace: spark
spec:
  accessModes:
    - ReadWriteOnce
  storageClassName: longhorn
  resources:
    requests:
      storage: 10Gi
Then the actual deployment is created. This used the Jupyter Lab image created from above, and the service account created in the RBAC section, to have the correct permissions to successfully run Spark Submit to the cluster API:
apiVersion: apps/v1
kind: Deployment
metadata:
  name: jupyter
  namespace: spark
  labels:
    app: jupyter
spec:
  selector:
    matchLabels:
      app: jupyter
  template:
    metadata:
      labels:
        app: jupyter
    spec:
      serviceAccountName: spark
      securityContext:
        fsGroup: 2000
      containers:
      - name: jupyter
        image: spark-jupyter:v1
        imagePullPolicy: Always
        env:
          - name: TOKEN
            value: sparkjupyter
          - name: PASSWORD
            value: sparkjupyter
        volumeMounts:
          - mountPath: /home/spark/workspace
            name: workspace
      volumes:
        - name: workspace
          persistentVolumeClaim:
            claimName: jupyter-pvc
Then a service is needed to access the Jupyter Lab frontend:
apiVersion: v1
kind: Service
metadata:
  name: jupyter
  annotations:
    metallb.universe.tf/loadBalancerIPs: 192.168.1.7
  labels:
    app: jupyter
spec:
  selector:
    app: jupyter
  ports:
    - name: http
      port: 8888
      targetPort: 8888
      protocol: TCP
  type: LoadBalancer
We also need another headless service, which is used by the executor pods to communicate with the driver that is running in client mode in the same pod as the Jupyter Lab (more details here):
apiVersion: v1
kind: Service
metadata:
  name: jupyter-headless
  namespace: spark
spec:
  type: ClusterIP
  clusterIP: None
  selector:
    app: jupyter
  ports:
  - name: driver-rpc-port
    port: 7078
    protocol: TCP
    targetPort: 7078
  - name: blockmanager
    port: 7079
    protocol: TCP
    targetPort: 7079
  - name: spark-ui
    port: 4040
    protocol: TCP
    targetPort: 4040
Spark Application
With all the kubernetes resources deployed, we can actually start deploying a Spark application and testing the the Spark History server and dynamic resource applications.
In the Jupyter lab instance, this notebook can be used as the full test. First are some import statements:
from pyspark.sql import SparkSession
import os
import sys
from random import random
from operator import add
Then we start the Spark session, with all the needed configurations:
spark = SparkSession.builder \
    .appName("DynamicAllocationDemo") \
    .master(f"k8s://https://{os.getenv('KUBERNETES_SERVICE_HOST')}:{os.getenv('KUBERNETES_SERVICE_PORT_HTTPS')}") \ # using the injected env vars to connect to the Kube API
    .config("spark.kubernetes.container.image", "192.168.1.3:3000/binayakd/spark-aws:3.5.4") \  # the image we built previously
    .config("spark.kubernetes.namespace", "spark") \  # kube namespace to deploy into
    .config("spark.kubernetes.authenticate.driver.serviceAccountName", "spark") \  # service account we created previously
    .config("spark.kubernetes.authenticate.executor.serviceAccountName", "spark")\
    .config("spark.eventLog.enabled", "true") \  # enabling logging to spark history server
    .config("spark.eventLog.dir", "s3a://spark-on-kube/event-logs/") \  # setting the spark history server logging location
    .config("spark.hadoop.fs.s3a.access.key", "sparkminio") \  # Minio Connection details
    .config("spark.hadoop.fs.s3a.secret.key", "sparkminio") \
    .config("spark.hadoop.fs.s3a.endpoint", "http://192.168.1.5:9000") \
    .config("spark.hadoop.fs.s3a.path.style.access", "true") \
    .config("spark.hadoop.fs.s3a.connection.ssl.enabled", "false") \
    .config("spark.hadoop.fs.s3a.impl", "org.apache.hadoop.fs.s3a.S3AFileSystem") \
    .config("spark.dynamicAllocation.enabled", "true") \  # dynamic resource allocation settings
    .config("spark.dynamicAllocation.shuffleTracking.enabled", "true") \
    .config("spark.dynamicAllocation.initialExecutors", "1") \
    .config("spark.dynamicAllocation.minExecutors", "1") \
    .config("spark.dynamicAllocation.maxExecutors", "6") \
    .config("spark.executor.cores", "2") \  # setting the executor resources
    .config("spark.executor.memory", "2g") \
    .config("spark.driver.host", "jupyter-headless") \  # configs to enure the executors can reach the driver though the headless service
    .config("spark.driver.port", "7078") \
    .config("spark.blockManager.port", "7079") \
    .getOrCreate()
With this initial session setup we can see the initial one executor pod get started (together with the pods of the other deployments already running):
$ kubectl get pods
NAME                                            READY   STATUS    RESTARTS   AGE
minio-856cf99dd8-chxlh                          1/1     Running   0          103d
spark-history-server-6d46bc784f-bbcn6           1/1     Running   0          99d
jupyter-5f79c495c9-pbknt                        1/1     Running   0          99d
dynamicallocationdemo-8114e596c51ef208-exec-1   1/1     Running   0          7s
Then we repurpose the calculate pi Example that comes with spark to run in this spark session:
def f(_: int) -> float:
    x = random() * 2 - 1
    y = random() * 2 - 1
    return 1 if x ** 2 + y ** 2 <= 1 else 0

def cal_pi(partitions):
    n = 100000 * partitions
    count = spark.sparkContext.parallelize(range(1, n + 1), partitions).map(f).reduce(add)
    print("Pi is roughly %f" % (4.0 * count / n))

cal_pi(10000)
While this operation is running, we can see the number of executor pods increase to the set limit of 6:
$ kubectl get pods
NAME                                            READY   STATUS    RESTARTS   AGE
minio-856cf99dd8-chxlh                          1/1     Running   0          103d
spark-history-server-6d46bc784f-bbcn6           1/1     Running   0          99d
jupyter-5f79c495c9-pbknt                        1/1     Running   0          99d
dynamicallocationdemo-8114e596c51ef208-exec-1   1/1     Running   0          3m5s
dynamicallocationdemo-8114e596c51ef208-exec-2   1/1     Running   0          7s
dynamicallocationdemo-8114e596c51ef208-exec-4   1/1     Running   0          5s
dynamicallocationdemo-8114e596c51ef208-exec-3   1/1     Running   0          5s
dynamicallocationdemo-8114e596c51ef208-exec-5   1/1     Running   0          4s
dynamicallocationdemo-8114e596c51ef208-exec-6   1/1     Running   0          4s
Once the operation finishes, we can see the value of pi calculated in the jupyter output: The results should be:
[Stage 0:===================================================>(9995 + 5) / 10000]
Pi is roughly 3.142720
After which the number of executer pods goes back down to 1:
$ kubectl get pods
NAME                                            READY   STATUS    RESTARTS   AGE
minio-856cf99dd8-chxlh                          1/1     Running   0          103d
spark-history-server-6d46bc784f-bbcn6           1/1     Running   0          99d
jupyter-5f79c495c9-pbknt                        1/1     Running   0          99d
dynamicallocationdemo-8114e596c51ef208-exec-6   1/1     Running   0          3m39s
To get the events to appear in the Spark History server, we need to stop the spark session:
spark.stop()
Once the Spark Session stops, we can have a look at the Spark History Server to see how the events:
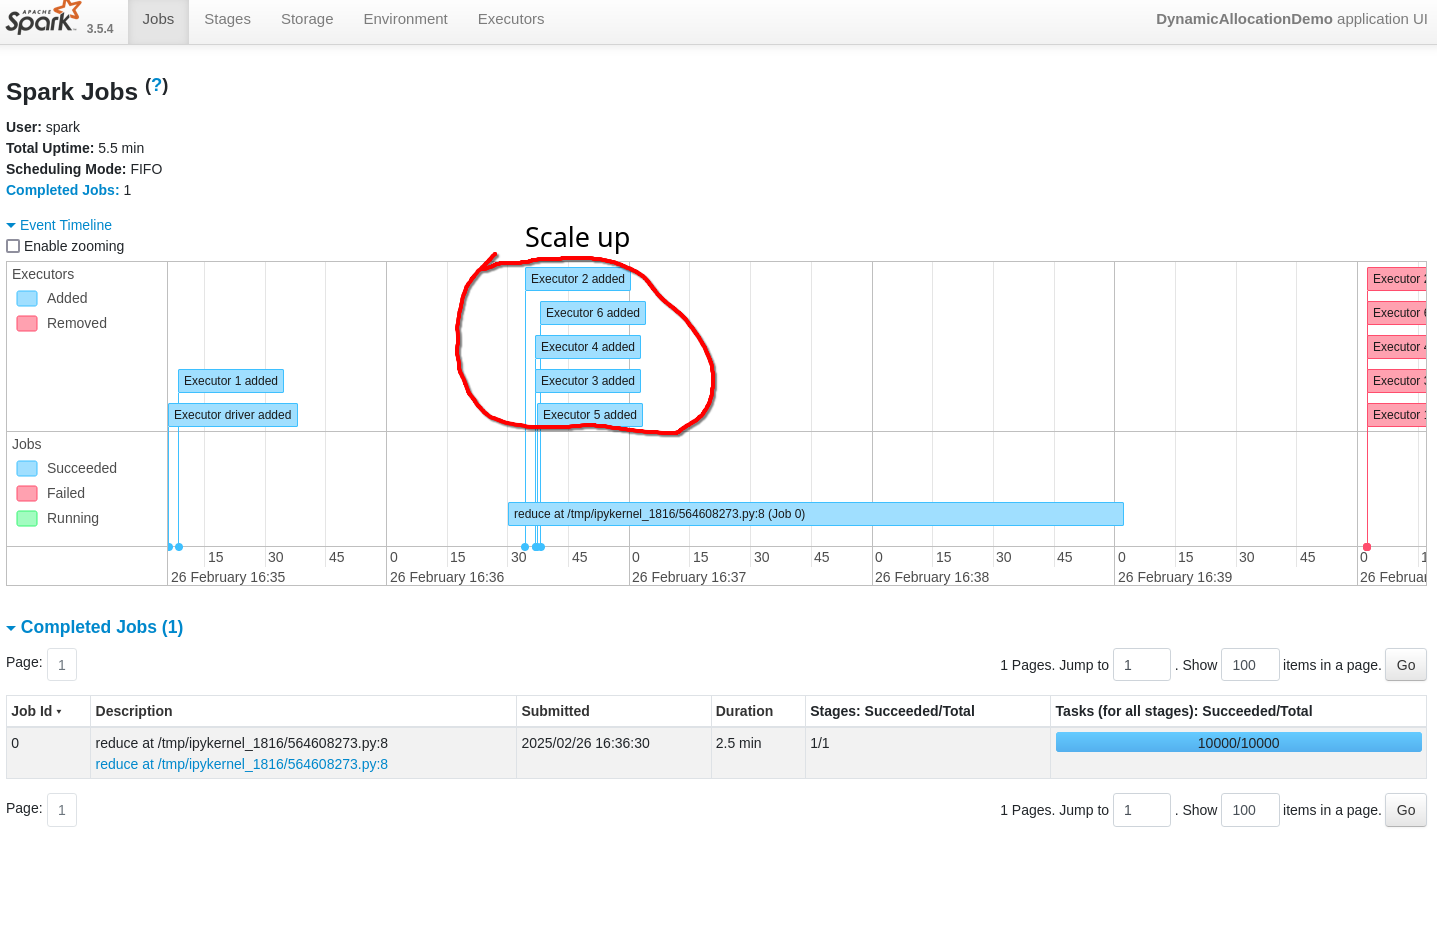
Here we clearly see the initial 1 executor, and then the ramp up to 6 executor when the compute resources were required. The interesting thing is, for some reason the reduction back to 1 executor is not shown properly, but all of the executors are shown to be removed at the end of the job. This contradicts the output from the kubectl commands, and is most probably a bug.